

Bryan M. Wolfe / Digital Trends
The initial Apple Intelligence features are gradually being introduced into iOS 18.1 developer beta versions prior to a public release later this fall. In iOS 18.1 beta 3, one of the most exciting new AI-based features, Clean Up, has finally been introduced.
With Clean Up, you can easily remove unwanted objects from your photos with just a few taps on your iPhone or iPad. It works with any image in your photo library, not just photos taken with your iPhone.
To use Clean Up and Apple Intelligence in general, you must have a compatible device. This includes the iPhone 15 Pro series, and iPads with M1 or later installed.
Here’s how to use the Apple Intelligence Clean Up tool.
How to remove objects from photos using Clean Up
With iOS 18.1 beta 3 or later installed, you can now begin to use Clean Up on your supported device. Activating it is a seamless process.
Step 1: First, open the Photos app on your device.
Step 2: Next, browse your photo library and choose the image you’d like to edit.
Step 3: From there, you’ll need to enter Edit Mode. Do this by selecting the Edit button at the bottom of the screen.
Step 4: Select Clean up.

Bryan M. Wolfe / Digital Trends
Step 5: Note: The first time you attempt to use Clean Up, there will be a few minutes of delay as Apple must download the AI model to your device.
After tapping on the Clean Up icon, the tool will automatically identify objects to delete, such as people. These objects will be outlined in color.
Step 6: To remove any of the automatically found highlighted objects, select them one at a time.

Bryan M. Wolfe / Digital Trends
Step 7: You can manually remove objects in your image that Clean Up didn’t find by doing any of the following with your finger:
- Tap on the object
- Circle the object
- Color in the object
You can use pinch-to-zoom to get closer to objects you want to remove.
Step 8: Remove the highlighted objects by tapping on them.

Bryan M. Wolfe / Digital Trends
Step 9: One you’re finished editing your photo, choose Done.
How to undo the removal of objects with Clean Up
A change made with Clean Up is never permanent if you don’t want it to be. After deleting objects, you can revert to an earlier version.
Step 1: To undo a change during the process, tap the Undo button at the top left of the app. This tool is designed to remove each change step by step.
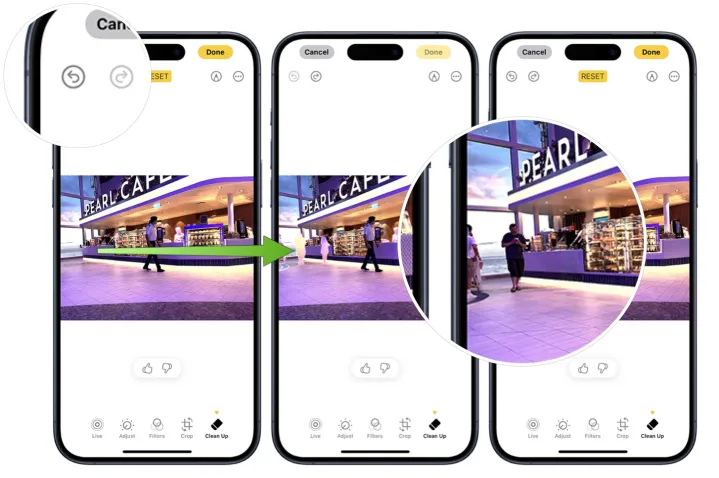
Bryan M. Wolfe / Digital Trends
Step 2: To undo changes later, select the image you wish to edit, then selct Revert. Choose Revert to original to confirm.
This tool is designed to remove all your changes.

Bryan M. Wolfe / Digital Trends
The Clean Up tool in Apple’s Intelligence is currently in beta, so there may be changes to it before it’s released to the public. As a result, the steps mentioned above could change, and we will update this article accordingly.
It is important to note that the effectiveness of the Clean Up tool may vary depending on the image’s complexity and the object you are trying to remove.